Thursday, March 3, 2011

Chicken Foot Chili

I know what you're thinking.  You're thinking this is one of those recipes with a crazy name but is actually a very tame recipe, and doesn't actually contain what the name alludes to.  This time, you'd be wrong.  This is actually chicken foot chili.


But don't run away yet.

Bryan has been trying to get me to eat chicken feet for some time now.  JenEhr began offering them, and course Bryan couldn't pass anything like that up.  I, however, was scared, seeing as how they are chicken feet.  The feet of chicken.  Feet.  But the more he persisted, the less scared I got.  After all, we knew these chickens.  These were happy, healthy, clean chickens raised on organic pastures.  These were chickens we knew to be raised with love.  And using the chickens' feet embraces the kind of whole animal eating we think is important (even if there are many edible parts of animals that completely freak me out when it comes to actually eating them).

A few Sundays ago, as I was making chili for lunch, Bryan was making chicken stock.  He pulled out some chicken feet to add to the stock.  The feet have extra gelatin and thus would lend to an extraordinarily rich stock.  The recipe I was basing my chili on called for chicken stock; I didn't have any defrosted (because we only use homemade, holla!), and Bryan suggested I just throw some chicken feet in instead.  I couldn't argue that it wasn't a good idea, because it made perfect sense.  I needed chicken stock, and I needed something to help thicken the chili.  Two birds feet, one stone, you know.  So I poured in some water, tossed in the chicken feet, and off it went.


It worked perfectly.  Not only was it a perfect substitution for chicken stock, but the feet helped thicken the chili nicely, eliminating the need for masa (which I'm not a huge fan of in my chili).  And the chili was downright delicious.  The beer, the combination of beans, and the chicken lent it a deeper flavor than my standard chili.  So while the sight of raw chicken feet may continue to tell me to run away screaming, I'll have to get over it, because they are the new secret ingredient in my chili.


Chicken Foot Chili

2 lbs beef (ground or cubed)
2 tbs bacon fat (or vegetable oil)
1 large yellow onion, diced
4 cloves garlic, minced
1 tbs ground cumin
1 - 12 oz bottle beer
1 - 14.5 oz can diced tomatoes with chiles
1 - 14.5 oz can crushed tomatoes
2 tbs chili powder
1 tbs dried oregano
1/2 tsp toasted garlic powder
1 - 14.5 oz can kidney beans, rinsed and drained
1 - 14.5 oz can black beans, rinsed and drained
4 cups water
2 chicken feet

Brown beef over medium high heat in large, heavy bottomed pot.  When no longer pink, remove with slotted spoon to drain on paper towels.  To the fat in the pot, add bacon fat.  Cook onions until barely golden, then add garlic and cumin.  Let cook until fragrant, 1 - 2 minutes, then add beer.  Reduce almost completely.  Add beef back to pot, along with tomatoes, spices, and beans, and mix thoroughly.  Add water and chicken feet; stir to combine.  Reduce heat to low and let simmer for 2 hours (or more).

Serve with desired toppings (such as cheese, sour cream, diced onion, cilantro, avocado) and cornbread.

Wednesday, February 9, 2011

Pork Cheek Ragù

I have a little love affair with cheeks.  Pork cheeks, veal cheeks - these are the smallish bits of the animal that are oh so melt in your mouth tender.  While I have problems adapting to the more unusual pieces of the animal, the cheeks don't bother me.  They are, after all, just more meat.  If I don't have a problem with pork belly (bacon!), cheeks shouldn't be so hard either.

We've had some pork cheeks hanging out on the freezer from our pigs as well as some from Dominion Valley Farm (which I'd been wanting to use to cure my own guanciale, but have not yet had the proper opportunity to set up a curing space for myself), so we decided we needed to use them.  I found this delicious looking recipe for Pork Cheek Ragù, which would also let me use the pasta maker for homemade pasta, and we were set.

This recipe is deceptively simple.  It sounds like something that will take you all day to prepare and cook, and while it's on the stove for hours, you need less than 30 minutes to actually work on it.  You essentially brown the meat, add everything else for the sauce, and braise the meat in the sauce for 3 hours or so.  And that's it.  It's literally so quick and simple I found myself re-reading the recipe a few times after everything was simmering to make sure I hadn't forgotten anything.  After 3 hours, the sauce has reduced and the cheeks are tender enough to be shredded with a fork.

some of the main players
trimmed pork cheeks
browning the meat
onions, celery, and garlic
wine, tomatoes, and herbs
the finished product

I lacked the powdered shiitake mushroom the original recipe calls for, so I just omitted it, but I could see how it would be delicious, so I left it in my adapted recipe.  I also about doubled the sauce recipe, since I felt we'd need more sauce, and we could have even had more.  (Bryan really, really likes sauce.)

Between the fantastic ragù and the homemade pasta, everyone at the table, including Oliver, could not stop commenting on how delicious a meal this was.  Oliver especially was shoveling food in his mouth at a near alarming rate.


So please, please, please - make this meal.  If you don't make homemade pasta, be sure to buy some papparedelle - the broader pasta is the only kind that can stand up to the thick, rich ragù properly.  (Trader Joes sells some nice ones.)  If you don't have pork cheeks, you can use something else - any cut of pork that has some fat, such as pork shoulder - just don't use something too lean.  Heck, you could even use beef (just use red wine instead of white).  I'll definitely be keeping this recipe on hand for quick meals, as well as dinner parties.  This recipe is perfect to impress your guests - and reduce stress at the same time.  Not only is it easy to make, but it can be made a day in advance, and only tastes better the next day.

Pork Cheek Ragù
(Recipe adapted from norecipe.com)

2 lbs pork cheek
1 large onion, chopped
2 stalks celery, chopped
4 cloves garlic, minced
1 cup white wine
2 1/2 cups stewed or crushed tomatoes
5 sprigs fresh thyme
1 tsp marjoram
2 bay leaves
1 Tbs powdered shiitake mushroom

Trim excess fat off the pork. Season the cheeks with salt and pepper.  Heat a heavy bottomed pot over high heat. Add the pork, fat side down, and cook until well browned. Turn to brown the other side.  Remove pork to plate.

Lower the heat and add the onions, celery, and garlic. Cook until soft. Deglaze the pan with the wine, increasing the heat and and reducing.

Add the tomatoes, thyme, marjoram, and bay leaf, stirring to combine. Add dried shiitake mushroom. Add the pork and juices to the pot, turning the heat to low.  Cover and simmer for 2-3 hours, or until the pork can easily be shredded with a fork.

Serve over fresh pasta.

Tuesday, February 8, 2011

My Italian Grandma

Meet my Italitan Grandma.

Pretty, no?

She is a Viante Cucina Pasta Maker, and she is quite amazing.

I've made pasta for years.  I started out rolling the dough out by hand with a wooden rolling pin, a crazy endeavor that took nearly all day, and thus happened rather infrequently.  My Mom gave us an Imperia Pasta Maker years ago to help with the task.  This hand crank machine certainly spread up the process, but still, making pasta at home took a few hours.  Roll, fold, roll, fold, roll, fold, roll, fold, roll, fold, roll... change the pasta maker setting to a smaller opening, and repeat.  Five times.  Once Oliver was born, homemade pasta making dropped off to roughly none in our house.  A sad but rather unavoidable truth.

Last fall, Mom and I were pursuing a Chef's Catalog when I happened upon the Viante Cucina Pasta Maker, and I daresay she took my breath away.  Put the ingredients in, push a button, and it makes the pasta for you?  How much simpler could it be?  I commented on it, and little did I know, but the wheels started turning in Mom's head.  She surprised us this Christmas with the machine as our gift.

I've made fresh pasta about every other every weekend since.  This machine makes it truly easy, and fast.  The process takes 30 - 40 minutes from start to finish, depending on the type of pasta you are extruding.  The machine comes with 10 pasta plates of different shape and size - linguine, fettuccini, spaghetti, rigatoni, vermicelli, ziti, tagliatelle, pappardelle, spaghettini, and biscotti.  The machine is fairly easy to assemble.  Once each part is in place, you add the ingredients, snap the lid on, and let the machine mix and knead the dough.


Once the dough is the correct consistency (this takes all of 3 minutes), you pull a tab out the side, allowing the dough to drop into the extruding chamber, and stand ready to catch the homemade pasta.


The dough will began to extrude through your chosen plate rather quickly.  Your only job is to stand guard, cutting the pasta at the appropriate length and watching the dough through the clear top of the mixing chamber to make sure it is neither too wet nor too try.  (The lid has a removable spoon covering a slot through which you can add more flour or water as necessary).  And that's it.  In 20 - 30 minutes, you'll have a pound or so of fresh pasta.  Delicious, soft, silky fresh pasta.  It's so easy, I feel almost ridiculous even thinking about using store bought, dried pasta.


My only complaints about the machine are that it is very, very loud, and it can be a bit messy on the top (where the hole in the lid is, because of adding additional flour).


But considering how messy and time consuming the alternative is, this is a small price to pay.  The machine itself is very easy to disassemble and clean; though, it is advisable to do so immediately after use, so that you can soak the parts in hot, soapy water for quicker clean up.  Cleaning up dried, cakey pasta dough is no fun.


The machine "only" does extruded varieties of pasta, so for anything large and flat (lasagna, ravioli, tortellini), I'll still need to use the Imperia machine to roll out sheets.  I have a Ravioli Rolling Pin (also from Mom), so hopefully that helps with the ravioli rather than stuffing each by hand.

I just realized I might be slightly obsessed with fresh pasta.

And that my mother might be trying to send me a hint about what she wants for dinner.

But if you've ever had it, you'll understand why.

Thursday, January 27, 2011

Hasenpfeffer

Bryan not so gently reminded me last night that I haven't had a post in awhile.  As it turns out, a job, a house, and two small children make for a busy (un)blogger.  Who woulda guessed?

Things have been churning along in our world.  No CSA, obviously, but we've been digging into our frozen stores of produce (even against Bryan's inexplicable need to hoard frozen fruit), as well as the insane amount of canned foods (which beg for their own post).  We've been doing a lot of braised type dishes, it being winter and all, which brings us to our Hasenpfeffer.

We've been trying to find the perfect rabbit dish, and always falling a slight bit short.  The dishes haven't been bad, but they haven't been quite what we were seeking.  At least for me.  I've been struggling with the rabbit.  I don't mind the killing and eating of the animals; no moral issue for me there.  But every time we've had it, a little voice in my head says, "You are eating a bunny rabbit."  I think it's been less the cute, cuddly thing, as the New Meat thing.  And the New Meat is an animal I never really considered as food before.  It has just enough of a different taste that I cannot convince myself that it's chicken.  It's like chicken, but more peppery. 

And so we keep trying.

This latest recipe, though, was a big success.  I had accidentally bought a big bag of prunes at Trader Joe's (I meant to get dates, don't ask me how I made that mistake), and had this crazy idea prunes may go well with rabbit.  A quick search resulted in a recipe for Rabbit and Onion Stew (Kouneli Stifado).  And good it was.  The prunes, onions, and tomatoes are such a nice accompaniment to the rabbit.  The rabbit itself was cooked perfectly.  I mostly ate the loin, which was juicy, and still slightly pink in the middle.  The legs were braised perfectly, but as they do have a slightly more gamey flavor, generally are not my favorite piece of the animal. Some candy stripe beets and homemade Greek bread rounded out the meal.


This recipe is a keeper.  Maybe I'll get over my weird rabbit problem yet.  (Oliver has no issues with it!)

Thursday, December 30, 2010

All I Want for Christmas is a Black Forest Cherry Torte

My parents host Christmas dinner, and I promised my Mom I would bring dessert.  While I like pie better than cake, I find I am far better at baking cakes than pies.  Since Mom was making Roast Pork Loin with Sour Cherries for dinner, I thought this Black Forest Cherry Torte would compliment dinner nicely.

I made a few minor modifications to the recipe.  I omitted the almond extract, since I'm not a fan.  Also, Bryan didn't find kirschwasser at the liquor, so brought home a cherry flavored brandy instead.

The torte itself is a rather involved process, though not overly difficult.  Step 1 had me baking 3 layers of chocolate cake.  One of the most time consuming parts of the entire process was finely grating 9 oz. of semisweet chocolate.  I grated three 3 oz. bars using the fine side of my box grater, which took roughly forever.  Surely there is a better way, one which I am not aware of.  Since the chocolate is not melted, but is rather folded into the cake batter, this was a necessary evil.  The perk was my fingers being covered in melting chocolate.

The cake batter also had me wishing I had an extra bowl for my mixer, as I first needed to cream the butter and sugar, and then beat egg whites.  I got by just fine without it, but my lazy self would have liked to have an extra bowl.

Since I made the cakes on Friday, I decided I would wait until Saturday to assemble the torte itself.  I was worried that the brandy would make the cakes soggy, and the whipped cream would begin to break down if I let it sit overnight.

Saturday morning, I assembled the cake: brandy, cherry preserves, and whipped cream in the middle.


And whipped cream frosting with chocolate shavings on top.


The cake was a huge hit. I have to admit, it was insanely delicious.  And, it turned out, even better the next day.  The brandy had some time to mellow out, and the cakes did not get soggy as I had feared, nor did the cream start to melt.  Next time, I'll definitely make the entire thing the day before.

Oh yes, I said next time.  This cake was definitely worth the effort.

Lamb Tagine

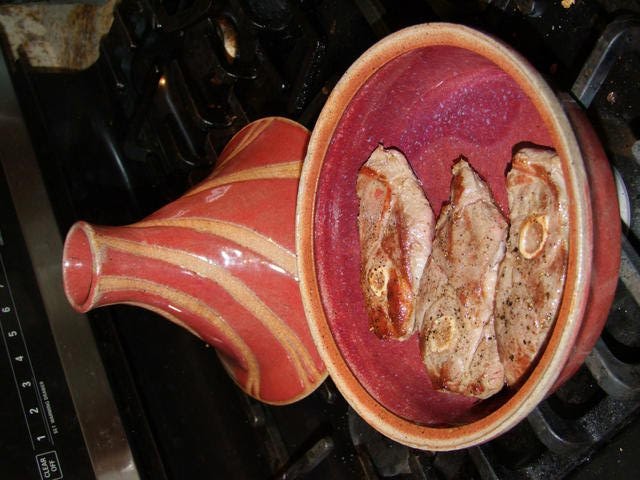
For one of our Christmas gifts, my very talented mother in law, Linda, made us a tagine.  Yep, made us one.  This is something we've been wanting to get for awhile, so we were very excited about the gift.

I did a little research, and seasoned the tagine before use.  Our first attempt was Lamb Tagine with Dates and Chickpeas.  We placed the tagine on the top of the stove, on top the cast iron griddle to accomplish the need for indirect heat (inside the oven would be fine as well).  We had the heat too low, so a little more heat would have been better, but overall the dish turned out delicious - and beautiful.


We're looking forward to trying out more recipes:

Chicken Tagine with Apricots and Spiced Pine Nuts

Beef-Short Ribs Tagine with Honey-Glazed Butternut Squash

Fresh Nectarine and Plum Moroccan Chicken Tagine

Lamb, Quince, and Okra Tagine

Sunday, December 12, 2010

Thankful

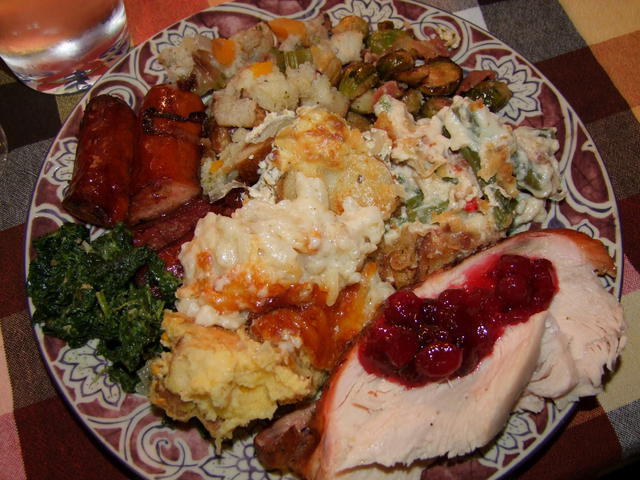
Thanksgiving went off without a hitch here.  We host each year, it being the holiday we feel best suits our cooking style.  Our goal was A Local Thanksgiving.  And we did pretty good - almost everything we prepared was sourced locally.

We invested in an American Bronze Heritage turkey from JenEhr farms.  Far different from your supermarket turkey, which have been bred for giant breasts and little flavor, heritage turkeys offer a variety of benefits.  For one, like many traditional foods, they are healthier:

They have reduced fat and cholesterol because they are adhering to a regimen that physicians usually recommend to their patients, i.e., to eat more greens and fiber, exercise daily and reduce stress levels. Meats, eggs and poultry from grass fed animals have a better balance of health-promoting essential fatty acids, such as omega-3 and omega-6, and have more vitamin E and beta carotene. Recent studies indicate that “grass-grown” meats are the richest source of good fats called CLA (conjugated linoleic acids), which may be linked to reducing the growth of tumors.  (JenEhr  Farms, Pasture Raised is Healthier).

Of course, raising meat on pasture has huge environmental benefits, as well. From requiring less fossil fuel to produce, to reducing greenhouse gasses, to less erosion, to healthier soil - there is an unending list of reasons why raising meat on pasture is better for the environment.

And they taste darn good, too.  They taste like turkey.

Our preference is to brine the bird.  After some research, Bryan used Alton Brown's highly recommended brine recipe.  Bryan used the caul fat from our pig (from Otter Creek Organic Farm) to cover the bird.


To go with the fantastic turkey, Bryan made gravy and I made Cranberries with Port, our version of cranberry sauce.

We planned a good number of side dishes because, well, that's what you do on Thanksgiving.

For the dressing, Bryan made a Pecan and Apricot Stuffing.  A fairly standard base of bread, onions, and celery, seasoned with sage, with toasted pecans and dried apricots added in.  Definitely a favorite around the table.  I had an entire second helping after the kids were in bed.

Bryan traditionally makes Diana Kennedy's corn budin (Budin de Elote), which is one of my favorite Thanksgiving dishes.  However, he decided to shake things up this year and make Alton Brown's Sweet Corn Bread Pudding.  I was skeptical, but I may actually like that recipe better.

Bryan also creamed some kale from JenEhr, and Shannon brought some polish sausage from a Polish deli in Chicago.  (My paternal grandmother being 100% Polish, every holiday comes with a side of polish sausage!)

We had some of the standards as well: brussel sprouts with bacon, Mom's homemade wheat rolls, Aunt Debbie's cheesy potatoes, and a potato gratin from my cousin (a Pioneer Woman recipe), as well as a green bean casserole.  We had just enough food, me thinks.


For dessert, Shannon made a Gluten Free Pecan Pie, and I made my Apple and Fennel Pie.  Instead of your standard pie crust, this year I made a biscuit topping based off Martha Stewart's Quince Biscuit Pie.  Definitely easier to make, and easier to make a large one, as well.  Also, I found the pie to be a lot less wet, which was a good thing.  My cousin brought Candied Bacon Ice Cream as well.  There were no complaints at dessert.

Good food and good company.  That's what the holidays are about!